The Use of the Microscope
OBJECTIVES
• identify the parts of the microscope, their purpose, and how they work
• describe and demonstrate the proper care of the microscope
• demonstrate proper focusing technique
• estimate the size of objects in a field
• return to a specific site on a prepared slide using the vernier scales on a mechanical stage
MATERIALS
• compound light microscope
• immersion oil
• lens paper
• lens cleaner
• prepared blood smear slide
• prepared slide of grid, ruled in millimeters (grid slide)
Most students enrolled in courses on anatomy and physiology have already completed one or more general biology courses.
For students of veterinary technology and for graduate technicians, the microscope is one of the most important diagnostic instruments used in their profession. A diagnostic-quality microscope is necessary to read fecal, blood smear, tissue smear, and urine sediment slides. The technician's work is to produce an accurate reading of the previously listed specimens. Without a quality microscope and a working knowledge of its use, this is not possible. Therefore, knowledge of a microscope's proper use, care, and safety considerations is critical. For some students, much of this chapter's information on the use of the microscope will be review. However, it may have been years since others took a biology course; for this reason the following material is provided.11
Copyright 2010 Cengage Learning. All Rights Reserved. May not be copied, scanned, or duplicated, in whole or in part. Due to electronic rights, some third party content may be suppressed from the eBook and/or eChapter(s).
Editorial review has deemed that any suppressed content does not materially affect the overall learning experience. Cengage Learning reserves the right to remove additional content at any time if subsequent rights restrictions require it.
Care of the Compound Microscope
The following is a list of operating procedures and safety rules for using a microscope.
These should always be followed when transporting, cleaning, using, and storing your microscope.1. Always use two hands to carry and transport a microscope; hold it in an upright position with one hand on the arm and the other under the base. Avoid jarring the microscope when setting it down.
2. Use only special grit-free lens paper for cleaning microscope lenses. Do this before using the microscope and before putting it away.
3. Always use a coverslip with wet-mount preparations so the liquid does not get on the objective lens.
4. Before putting the microscope in the storage cabinet, be sure to remove the slide from the stage, rotate to the lowest power objective lens, and replace the dust cover (if available). If the stage is movable rather than fixed, move it to its lowest point.
5. Always begin focusing with the scanning objective lens; this is the lowest power objective lens, usually the 4X objective. Use the coarse adjustment knob only with the lowest power lens. Never focus using the high magnification or the oil immersion objective lens by moving the objective lens and slide toward each other; this may cause breakage of the glass slide or, far worse, scratch the lens. Once you have focused the microscope with the lowest power objective, then you may move a higher power objective into place.
6. When using oil, use the focusing method listed previously or start with the objective lens touching the oil, and use the
fine adjustment knob to bring the slide’s structure into view.
7. Always clean the oil completely from the oil immersion objective lens and the microscope stage before switching to the other lenses.
EXERCISE 2.1 IDENTIFICATION OF THE PARTS OF THE MICROSCOPE
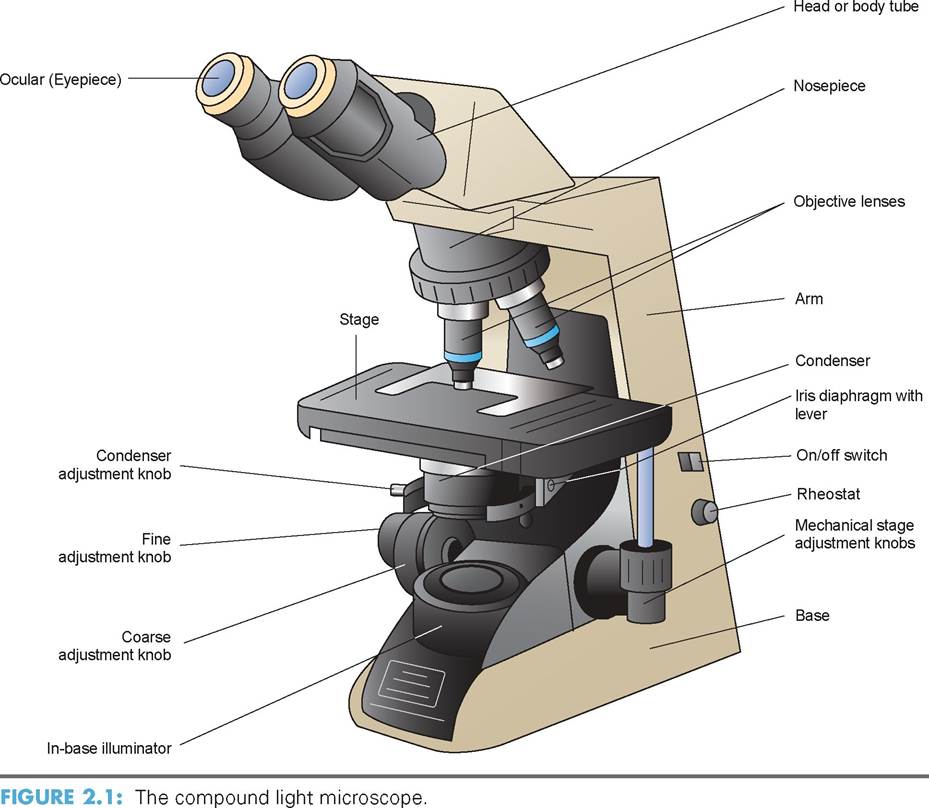
Using Figure 2.1 and your microscope, identify the following parts.
1. ocular (eyepiece): Microscopes are either monocular (has one eyepiece) or binocular (has two eyepieces). Each eyepiece, or ocular, consists of a tube containing the ocular lens that fits into a tube at the top of the head or body tube of the microscope.
The ocular lens is usually a 10X or 10-power magnification lens (some are 15X). In other words, it increases the apparent size of the object by 10 times or 10 diameters. Usually one of the oculars contains a pointer, which can be rotated to indicate a specific area of concern to the viewer. If your microscope’s oculars have no pointer, ask the instructor if one can be added, or perhaps another microscope has a pointer in both oculars and can be traded.2. objective lens: Scanning, low power, high power, and oil immersion (usually 4X, 10X, 40X, and 100X, respectively).To calculate the total magnification using each lens, multiply the power of the eyepiece by the power of the objective lens:
10X x 40X = 400X
3. base: The bottom support for the microscope on which it rests on the table. Some microscopes have an inclination joint, which allows them to be tilted backward for viewing dry preparations.
4. head (body tube): Supports both the oculars and the rotating nosepiece containing the objective lenses. Through a system of mirrors within, the body tube projects the image from the objective lens to the eyepiece.
5. arm: Vertical portion of the microscope connecting the base to the head.
6. coarse adjustment knob: Used to make large adjustments in the distance between the specimen and the objective lens to focus on the specimen.
7. fine adjustment knob: Used to make small, or fine, adjustments in the distance between the specimen and the objective lens to focus on the specimen. It is used for precise focusing once the coarse focusing has been done.
8. condenser: Contains a lens that focuses light on the specimen. A height-adjustment knob that raises and lowers the condenser (and lens) to vary the light delivery is present on all quality microscopes. Generally, the best position for the condenser is close to the bottom surface of the stage.
9. stage: This is the platform upon which the slide rests during viewing. There are two types of stages: a mechanical stage and a stage equipped with spring clips to hold the slide in place.
Most diagnosticquality microscopes have a mechanical stage to permit precise movements of the specimen.10. nosepiece: This part contains three or four objective lenses, which are changed by rotating the desired lens into proper position over the specimen. The nosepiece should be used to rotate the lens rather than grabbing the lenses themselves.
11. iris diaphragm with lever: As the arm, or lever, attached to the condenser is moved, the iris diaphragm opens or closes to permit a variable amount of light to pass through the condenser. It provides the best possible contrast for viewing a specimen.
12. filter: A blue filter (not shown in Figure 2.1) is placed between the illuminator and the condenser to change the color of light from a yellow-white to a cooler blue-white. This is easier on the viewer’s eyes, and the colors of prepared specimens appear more vivid.
13. in-base illuminator: Also known as the substage light (or is a mirror in low-tech microscopes), this part directs light toward the condenser.
14. rheostat: Also known as the light control, this knob allows for variable degrees of light output by the in-base illuminator.
EXERCISE 2.2 USE OF THE COMPOUND MICROSCOPE
Use the following steps for focusing your microscope using the 4X, 10X, and 40X objective lenses.
1. Determine if the microscope you are using has a movable stage (i.e., it moves up and down, toward and away from the objectives) or if the objectives move (toward and away from a fixed stage).
2. Plug in the microscope’s cord and turn it on. Adjust the rheostat or light control to the middle of its range.
3. Close the iris diaphragm completely; then open it halfway.
4. Raise the condenser to the fully up position.
5. Position the fine adjustment knob about halfway between the limits of its movement.
6. Make sure all the objectives are screwed in tightly.
7.
Rotate the 4X objective into the viewing position (you should feel it click into place). It is best to start with the 4X objective when focusing on an object.8. Obtain a microscope slide and place it snugly in the mechanical stage forks with the specimen side up. Center it exactly over the condenser.
9. Prior to looking through the eyepieces, observe the microscope from the side and turn the coarse adjustment knob so the objective is positioned as close to the slide as possible. The specimen should be brought into focus by turning the coarse adjustment knob to move the objective and stage apart. You should not attempt to adjust the coarse adjustment knob toward the specimen when looking through the eyepiece; breakage of the slide or coverslip may occur.
Steps 10-12 assume you are using a standard microscope having a rotational focusing left eyepiece.
10. Look into the eyepieces and close your left eye. Bring the specimen into focus using the coarse adjustment first, then the fine adjustment. The slide may have to be moved to bring it into the field of view.
11. With both eyes open, adjust the interpupillary difference between the left and right oculars so that one circular field of view is visible with both eyes open. Make note of the distance so it may be easily set the next time you use the microscope.
12. Now close your right eye and rotate the left-eyepiece focus adjustment (not the fine adjustment knob) to obtain a sharp focus for the left eye alone.
13. With both eyes open, adjust the iris diaphragm to obtain the sharpest image possible, and adjust the illuminator for comfortable and clear viewing brightness. The microscope is now adjusted precisely for your eyes and should provide the sharpest image possible.
14. Before changing to a higher-power objective lens, move the part of the specimen you are studying to the exact center of the field of view.
15. Change to the 10X objective. If you centered your specimen properly, the part you chose to study should be in view. Modern microscopes are parfocal, meaning only slight fine-adjustment corrections will be necessary when changing lenses.
However, brightness and diaphragm adjustment may also be needed to produce a crisp image.16. Now change to the 40X objective lens. If the part of the specimen you chose to study is not in view, rather than searching around for it, go back to the 10X objective, re-center, and change back to the 40X objective. Again, slight corrections may be needed in the fine adjustment knob, the diaphragm, and the illumination.
Method of Focusing Using the Oil Immersion Lens
The use of an oil immersion lens requires a drop of immersion oil to be in contact with both the slide and the lens itself. If the oil is not in proper contact, light is refracted (bent) in such a way that some is lost and the image becomes blurred. As the level of magnification increases, the working distance (space between the lens and the specimen) decreases, and more light is required for accurate viewing. With an oil immersion objective lens the working distance is very short, and thus care must be taken when positioning the lens. Otherwise, broken slides, cracked coverslips, or even damage to the lens surface may occur. Follow the following steps to view a specimen with an oil immersion lens.
1. Obtain a prepared slide of blood.
2. Start with the scanning lens, progress to the high-power lens, and focus as previously described. Find a part of the slide you would like to observe and center it.
3. Rotate the high-power lens aside, and place one drop of immersion oil on the slide over the light opening.
4. Rotate the oil immersion objective into position. The lens should touch the oil and be just short of touching the slide. Do not rotate the other objective lenses over the immersion oil.
5. Look through the eyepieces and move the iris diaphragm to adjust the light. It also may be necessary to adjust the condenser up and down. If the light is too bright, it will be difficult to distinguish the cells from the background.
6. Focus upward with the fine adjustment knob until the blood cells come clearly into view. Note the red blood cells, which lack nuclei, and the white blood cells, which have nuclei.
7. Remove the slide when you are done and clean it with lens cleaner and lens paper.
8. Wipe the oil from the oil immersion objective lens, and swing the scanning power objective back into position.
In order to prevent damage and misalignment of the microscope’s internal parts, always follow the following steps when preparing it for storage.
1. Remove any slide from the microscope’s stage.
2. Clean the instrument, including the lenses, to remove any fluid from the specimens or any oil left in contact with the objectives.
3. Open the iris diaphragm.
4. Raise the condenser to its highest position.
5. Move the scanning objective into viewing position, if not already done.
6. Center the mechanical stage so it has minimum projection on either side of the fixed stage.
7. If the stage is movable, lower it to its lowest position.
8. Wrap the electric cord around the base.
9. If available, place a dust cover over the instrument.
10. Using both hands, as previously described, return the microscope to its proper storage place.
EXERCISE 2.3 DETERMINING THE SIZE OF THE MICROSCOPE FIELD
During the previous exercise, you undoubtedly noticed that the size of the microscope field decreased as the magnification increased. It is useful to know how to determine the diameter of each of the microscope’s fields. This information will allow you to make a fairly accurate estimation of the size of the objects in any field of view. For example, if you know the field of view is 4 mm, an object that takes up approximately 1/4 of the field is about 1 mm in size.
Microscope specimens are measured in micrometers or microns (μm) or millimeters (mm). A millimeter is 1/1,000 of a meter (10-3 m), and a micrometer or micron is 1/1,000,000 of a meter (10-6 m).
Using your microscope, use the following steps to determine the size of a field.
1. Obtain a grid slide (a slide prepared with graph paper ruled in millimeters). Each grid section is 1-mm square. Using the lowest power objective (4X, scanning objective), bring the grid lines into focus.
2. Move the slide so that one grid line touches the left edge of the field; then count the number of squares across the diameter of the field at its widest point (Figure 2.2). On the right side, if only part of a square is visible, estimate how much of the square can be seen and calculate the decimal equivalent to the portion of the square visible (i.e., if half the square can be seen, 0.5 mm is visible).
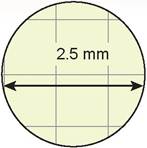
FIGURE 2.2: The grid scale.
3. Repeat the procedure using the low power objective (10X objective), and record your observations in the following chart. The high power and oil immersion data will need to be calculated using the formula in step 4 below.
Summary Chart for Microscope #__________
| Scanning | Objective Lens Magnification | Total Magnification | Field Size |
| Low power | |||
| High power | |||
| Oil immersion |
4. Complete the chart by computing the approximate diameter of the high-power and oil immersion fields using the following formula (note the following abbreviations: HPF = high power field, LPF = low-power field, HP = high power, LP = low power).

Therefore, if the diameter of the LPF is 2 mm and the total magnification of the LPF is 100 (10 ? 10), and if the total magnification of the HP objective is 400 (10 ? 40), then

5. Find a nucleated white blood cell on the blood smear slide under the oil immersion lens and estimate its size.
EXERCISE 2.4 USING THE VERNIER SCALES ON THE MECHANICAL STAGE
Occasionally, during the course of using the microscope, you may need to return to an exact point on a specimen slide or to record where a certain cell or lesion can be found. Remembering landmarks on the slide may be one way of doing this, but it is not precise. A more exact way is to use the verniers to re-locate structures. Verniers are scales located on both the x and y axes of the mechanical stage. A vernier consists of two parallel, graduated, sliding scales, one long and one short. The smaller scale is 9 mm long and is divided into 10 subdivisions (0 to 10). The larger scale is several centimeters long
and is graduated in millimeters (e.g., 0 to 100 mm). Read the following steps to learn how to pinpoint locations using the vernier scale.
1. First, center the object of concern in the field of view.
2. Read the vernier scales on the x and y axes. To do this, locate the point at which the 0 line of the small scale meets the large scale. In Figure 2.3, the 0 line on the small scale is located between 42 and 43 on the large scale. Now find the line on the small scale that coincides exactly with a line on the large scale. Then, count on the small scale the number of spaces between 0 and the point of coincidence. This number is your decimal point. In Figure 2.3, the line of coincidence is the sixth line on the small scale; thus, it is 0.6. Therefore, the final reading for the location would be 42.6 on the x or y axis, depending on which you were reading.

FIGURE 2.3: The small and large vernier scales.
3. Using your blood slide again, locate an unusual-looking white blood cell and center it in the field of view.
4. Using the technique described previously, record the location of this cell on the x and y axes in the space provided below (note: units are in mm).

5. Without removing the slide, move the mechanical stage so you are looking at the periphery of the blood smear or coverslip.
6. Return to the cell found in step #3 by moving the mechanical stage controls until the verniers are adjusted to the number recorded in step #4. The cell you observed previously should be somewhere within the microscope’s field of view.
Summary
Because the microscope is one of the most often used and expensive pieces of equipment in a veterinary hospital, knowledge of its care and use is vital to both veterinarians and veterinary technicians. In this chapter you learned about the parts of the microscope and their use. One of the most underused skills is logging a location on a slide and returning to it using the vernier scales, and for this reason it was explained in this chapter.
REVIEW QUESTIONS
1. On what power lens should you use the coarse adjustment knob?
2. If you have a 10-power ocular and are on oil immersion (100X), what is the total magnification?
3. What is the purpose of the condenser, and what happens when it is raised and lowered?
4. What is the rheostat?
5. Describe the method of focusing the microscope so that both eyes are in perfect focus.
6. What is the meaning of the word parfocal?
7. What might happen if oil were to be left on the oil immersion lens?
8. If you are using a microscope with 10X eyepieces, and the diameter of the LPF is 2.5 mm, the LP objective is 10X, and the HP objective is 40X, then what is the diameter of the HPF?
9. Using a vernier scale on a microscope, the “0” on the small scale is located between 55 and 56, and the lines of the large and small scale line up on the small scale’s 7. What does the location number equal?
10. Would the answer to Question 9 be sufficient information to return to that exact location on the slide?