For many years there has been a marked decline in the number of dairy units in Britain.
From 1960 to 1996 the number of holdings decreased from 151,000 holdings to 35,480 and the trend continues. Over the same period there was a much smaller reduction in the total number of cows, from 3.16 to 2.58 million.
Yield per cow, on the other hand, rose from 3320 to 5500 litres. The effect of this was that the size of the average dairy herd increased from 21 to 73 cows, with many individual herds of over 200 cows. In turn this led to the need for a more specialised stockman. Many of the routine tasks and basic treatments which were once considered to be the province of the veterinary surgeon are now being carried out by stockmen and women, and it is likely that this trend will continue. The vet will do less routine work and instead will spend more time on preventive medicine programmes, training, monitoring performance and organising fertility control schemes.Much of this book has been written with these changes in mind, that is to try to give the stockman a better understanding of the principles involved in disease control. It is more difficult to give a written description of practical techniques, however, and I would urge the reader to contact his local agricultural training group, for example ATB Landbase in the UK. They organise some excellent courses, where trainees are given the theory of the task as well as undertaking supervised practical training.
In the following I have tried to give guidelines and practical advice on some of the more basic procedures which the stockman may have to perform.
Responsible Use, Storage and Disposal of Medicines
With increasing consumer concern about animal drug residues reaching the human food chain, it is extremely important that farm medicines are used and seen to be used responsibly. Legislation will vary in different countries and the reader must consult local regulations. For the UK the following are important areas of consideration.
Important aspects of the use of medicines:
• safe storage
• responsible use
• records of all treatments
• safe disposal of needles, bottles and unused medicines
Safe storage A special cupboard or room separate from the dairy is needed for medicine storage, and with increasing concern over drug abuse in man, needles and syringes should be equally as carefully controlled. Keep all medicines away from direct sunlight. Store all vaccines in a refrigerator. Read the labels on other drugs: some advise cool storage, others do not. A domestic fridge with a chain around it and running through the handle can be very conveniently locked with a padlock.
Responsible use Medicines should only be used when they are indicated. For example, in a lame cow which shows no swelling of the foot it is pointless injecting her with antibiotic without first lifting and examining the foot: there may be a nail penetrating the sole. Similarly, if a cow is slightly off-colour, but has no increase in temperature, you would need more than a diagnosis of ‘off-food’ to justify the use of antibiotics. (Of course the situation would be very difficult if, for example, you know you have leptospirosis circulating in the herd.)
Figure 14.1. Form for recording purchase and administration Ofanimal medicines, a UK legal requirement from The Animals, Meat and Meat Products Regulations 1991. The legislation has now been simplified and so the reader should consult the specific requirements of the purchaser of his product or FarmAssurance Scheme.
SCHEDULE 2 Regulation 20(1)
VETERINARY MEDICINE ADMINISTRATION RECORD
THE ANIMALS, MEAT AND MEAT PRODUCTS (EXAMINATION FOR RESIDUES AND MAXIMUM RESIDUE LIMITS) REGULATIONS 1991
Name and full address of person keeping the record...........................................................................................................................
| Date of purchase of veterinary medicine | Name of veterinary medicine and quantity purchased | Supplier of veterinary medicine | Identity of animal'group treated | Number treated | Date treatment finished | Date when withdrawal period ended | Total quantity ofveterinary medicine used | Name of the person who administered veterinary medicine |
428 A VETERINARY BOOK FOR DAIRY FARMERS
You will get optimum value from medicines if they are used properly.
Discard contaminated and out of date medicine bottles and use clean equipment for administration. It is important that your syringes and needles are rinsed through with clean water after use and that they are then boiled or soaked in alcohol to sterilise them. They should be stored, ready for use, in a clean, dry container with a lid. If a new needle and syringe are used for each course of injections, it is probably very little extra expense compared to the cost of the drug or the value of the animal being treated.Records of all treatments It is a legal requirement in the UK to record all purchases and use of medicines (The Animals, Meat and Meat Products Regulations 1991). Many medicines will be purchased from the vet, although wormers, fly treatments, vitamins etc. may be purchased from a local merchant. All administrations must be recorded, whether they be oral, by injection, intramammary tubes or even intra-uterine pessaries, and the date, animal identity, amount used and withdrawal period, together with the name of the person administering the medicine, must also be given. The original form of the record required is shown in Figure 14.1.
Safe disposal Used needles are best disposed of in specially designed ‘Sharps’ containers, which can be taken away and incinerated when they are full. Do not put them in with normal household rubbish, as they can cause injury to refuse collection personnel. Empty and out of date medicine bottles can be conveniently dropped into a 25 litre plastic drum (most injection bottles fall through the neck quite easily) and the whole drum can be either incinerated or deeply buried when full.
Giving an Injection
Injections can be given in four ways:
• intradermal (into the skin)
• subcutaneous (under the skin)
• intramuscular (into the muscle)
• intravenous (directly into the bloodstream)
Intradermal injections are used in the tuberculosis test (see Plate 11.9). The intravenous route gives the most prompt effect and it may have to be used for certain drugs which will cause irritation if given subcutaneously or intramuscularly.
There are dangers in giving intravenous injections too fast, and some preparations, e.g. magnesium, are not suitable for intravenous use.You should always read the instructions and consult your vet before administering any drug, and before giving the injection, make sure that the animal has been firmly restrained.
When giving an injection, you are administering chemicals directly into the body, and in so doing, many of the animal’s normal defence mechanisms are being by-passed. If bacteria are introduced there is a risk of serious side-effects, so cleanliness and hygiene are essential.
Whatever the route of injection, make sure that the site chosen is clean. Ideally you should use a swab soaked in methylated spirits, but this is not usually done, and provided that the skin is not covered with mud or dung and that your needle is clean, the risk of abscess formation in cattle is low.
If you are repeatedly taking doses from the same pack without an automatic syringe, you must make sure that you leave one needle in the bottle to transfer the drug into the syringe and use a second needle to carry out the injections. For vaccines especially, if you use the same needle to inject the animal and then to draw the next dose from the bottle, there is a serious risk that you will introduce infection into the bottle. This not only risks abscesses in subsequent cattle, but can also inactivate the vaccine.
To fill the syringe
First shake the bottle to make sure that the contents are thoroughly mixed. Many antibiotics are in a suspension rather than fully dissolved and if you simply inject the liquid taken from the top of the sedimented drug you will be seriously underdosing. With the syringe plunger depressed and the bottle
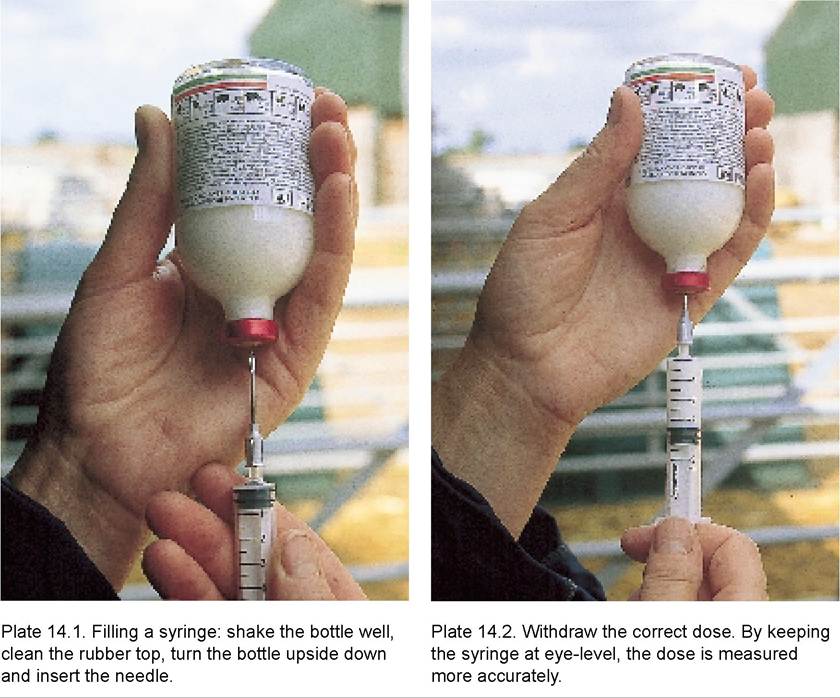
held upside down, insert the needle through the rubber bung (Plate 14.1). Then, holding the syringe at eye level, slowly pull the plunger back until you have the correct dose (Plate 14.2).
If this creates an excessive vacuum in the bottle, simply disconnect the syringe from the needle (Plate 14.3). This allows air to enter and the filling process can then be continued. I do not like the more traditional method of first pumping in a volume of air equal to the volume of injection to be withdrawn. There is a greater risk of contaminating the drug, and it will put some bottles under so much pressure that the drug will be forced out through the rubber bung beside the needle.Subcutaneous injections
I prefer to use the loose skin behind the shoulder. Catch hold of a fold between your finger and thumb, then push the needle forwards towards the shoulder (Plate 14.4). The cow’s skin is very tough (after all, it is leather!) and you will be surprised how much force is needed, even with a sharp needle. If you are dosing large numbers of animals, for example blackleg vaccination or worming, then change the needle for a clean and sharper one every 15 to 20 animals, or immediately if you think it is dirty. The use of automatic syringes is discussed later in this section, and the special requirements needed with calcium injections in Chapter 6.
Intramuscular injections
In adult cattle I use the area of muscle covering the pelvis on either side of the tail. Firmly grasp the needle between your forefinger and thumb, and then stab it downwards with as much force as you can.
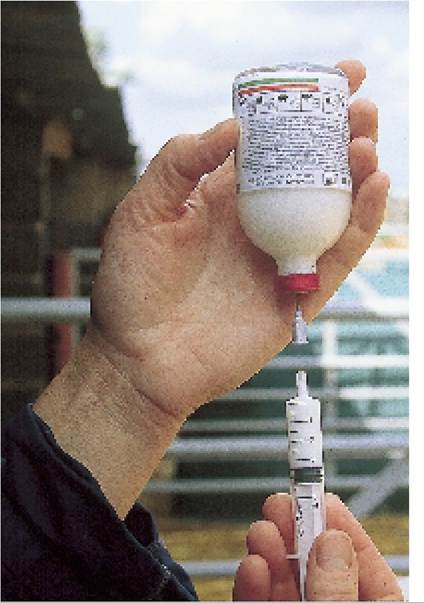
Plate 14.3. If a high vacuum in the bottle prevents further drug withdrawal, uncouple the syringe and allow air to enter.
Connect the syringe and inject. A 25 mm needle should go in up to its butt, and in a fat cow a 40 mm needle will be needed. It is best to make the injection fairly well forward, towards the wing of the pelvis. It is often cleaner in this area, there is a good depth of muscle and the chances of injecting through into the pelvic cavity are minimised. Plate 5.7 shows that ligaments connect the sacral spine to the pelvis over the central pelvic area, and going too deep (e.g.
using a very long needle on a thin cow) can result in the injection going through the ligament and even penetrating the rectum! If the injection is made further forwards, then an excessively long needle will impact on the pelvic bone - not ideal, but at least you would know and could start again!In younger animals I use the fleshy part of the hind leg (Plate 14.6) and often hold the syringe in the palm of my hand, with the needle attached
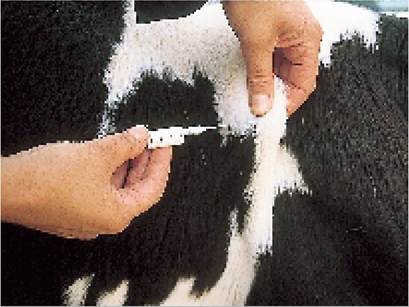
Plate 14.4. Subcutaneous injections are given by lifting a fold of skin behind the shoulder.
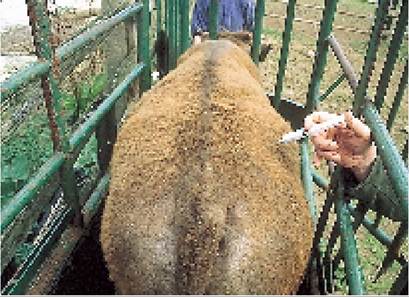
Plate 14.5. Intramuscular injections can be given into the pelvic gluteal muscles in adults.
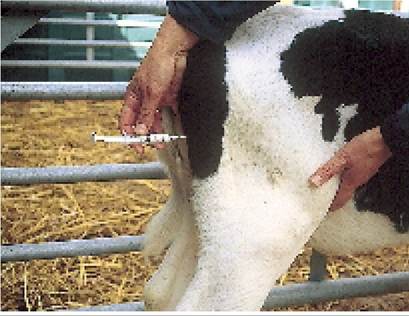
Plate 14.6. In calves, intramuscular injections are often given into the hind leg.
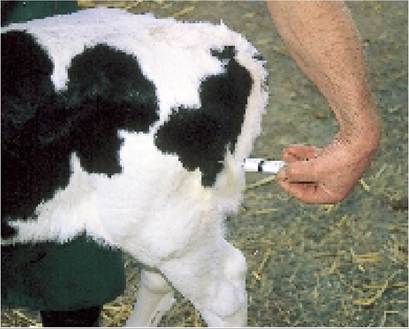
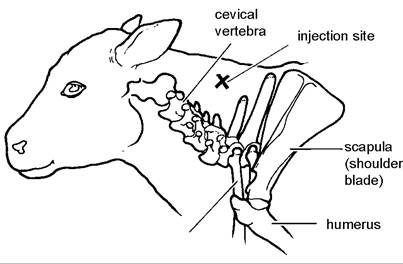
Figure 14.2. The neck is a useful intramuscular injection site, avoiding the more expensive cuts of the carcase.
Plate 14.7. Holding the syringe like this permits rapid injection.
(Plate 14.7). When the needle reaches its full depth in the muscle, the force from the palm of your hand propels the plunger forwards and the injection is given very quickly.
Although these are the ‘traditional’ sites for injection, they are also the most expensive cuts of the carcase and often the areas where the skin is most soiled with faeces. Even if infection is not introduced, an injection of a foreign substance can leave a scar in the muscle, especially if certain long-acting antibiotics, which tend to be irritants, are used. Because of this there has been a trend towards giving intramuscular injections into the neck muscle, as shown in Figure ˛4.2. The diagram shows that the spine, after leaving the base of the skull, dips down quite deeply towards the chest at the point where it is covered by the shoulder blade. This means that there is plenty of muscle, with no dangerous structure beneath, in the upper part of the neck. The ideal site for injection is at least one full hand-span back from the lower base of the ear, as shown in Figure 14.2.
Intravenous injections
These should always be given slowly and with great care. Thejugular vein is found in a furrow which lies between the trachea and the muscle of the neck, shown as a white chalk mark in Plate 14.8. In this vein, blood is flowing from the head back to the heart, so if you obstruct the vein using finger pressure or a rope around the neck, you will see it swell up. I find it best to stab the needle into the centre of the vein first, slightly adjusting its position until blood flows. Then incline the butt of
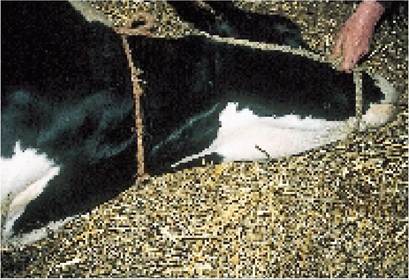
Plate 14.8. The chalk mark shows the position of the jugular vein.
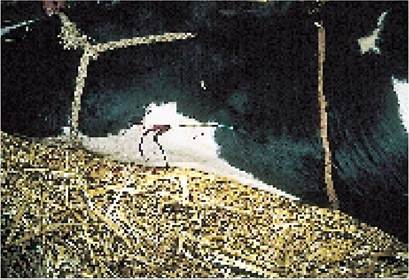
Plate 14.9. Intravenous injection. It is best to have the needle inserted to its full depth and with the tip pointing down the vein towards the heart.
the needle towards the cow’s head and push the point down the vein until the butt is against the skin. This is shown in Plate 14.9. Once in this position the needle is far less likely to come out of the vein while the injection is being given.
Collapsible packs and flutter valves Many large-volume injections are now prepared in plastic packs which collapse as the liquid runs out of them (Plate 14.10). These tend to be more expensive than the older-style bottles, but as there is no need to sterilise the ‘giving set’ each time, I think that the extra cost is well justified for on-farm use. Sometimes you have to use bottles, however, and the flutter valve is a device to allow air to enter the bottle as the injection liquid runs out.
It is used as follows. First attach the head of the flutter valve to the neck of the bottle, then turn the bottle upside down and check that air is entering through the air-bleed and that liquid is flowing through the tubing. Next insert the needle into the cow; then, making sure that there is no air left in the tubing by running through a drop more fluid, connect the tubing to the needle. Adjust the height of the bottle so that liquid runs in at the correct speed (Plate 14.11). You can check this by the rate at which bubbles are entering the bottle.
Automatic syringes
Many procedures, for example worming and vaccinating, are most easily carried out using automatic syringes. They have three great advantages: they are easy to use, the rubber seal on the top of the injection bottle is only punctured once and there is less risk of contaminating the drug. However, using the same needle repeatedly for a large number of animals can lead to the transmission of infection on a
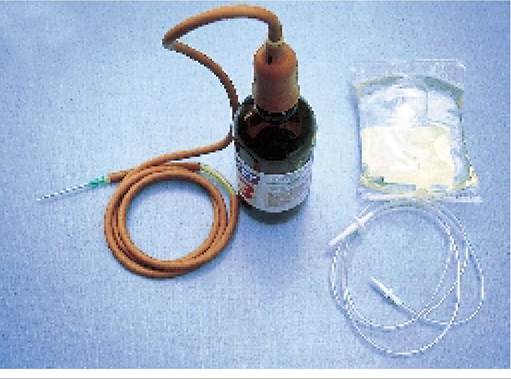
Plate 14.10. Rubber flutter valves (left) are used for bottles. Plastic dispensing packs (right) may be more convenient for on-farm use.

Plate 14.11. Adjust the height of the bottle to give the correct rate of flow - assessed by the rate of entry of air through the valve.
dirty needle. To overcome this, one manufacturer has produced a self-sterilising system, shown in Figure
14.3. The sterilising foam cap is held in a spring-loaded barrel, through which the needle must pass each time an injection is made. One cap will remain effective for three days or 100 injections and is relatively
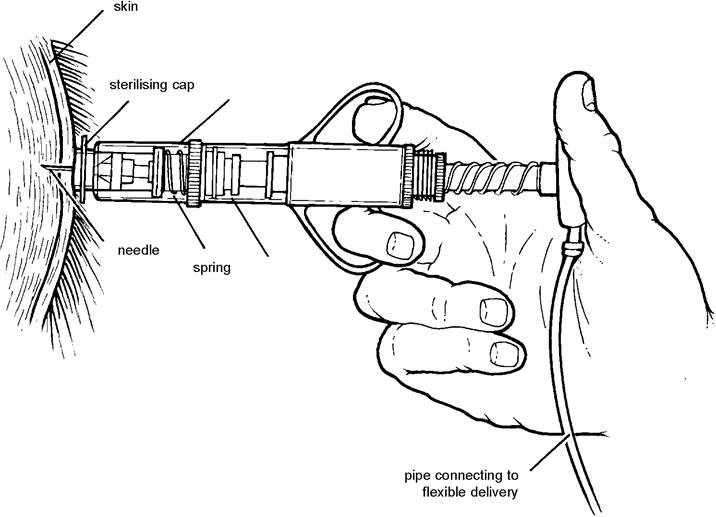
Figure 14.3. Mechanism of action of a self-sterilising multidose syringe. (Sterimatic Ltd)
cheap. This system certainly reduced the incidence of injection abscesses in sheep and it has the added advantage of protecting the needle when not in use, thus reducing considerably the risk of accidental self-injection. I find this particularly helpful. Self-sterilising attachments can be fitted to almost all existing multidose syringes, and the sterilising caps can also be fitted onto the top of glass bottles of injection.
Giving a Drench
Drenches are best administered using a special dosing gun because the nozzle can deliver the liquid so far back over the tongue that it is virtually impossible for the animal to spit it out. Plate 14.12 shows the heifer’s head being held well up, with the delivery pipe of the gun passing across the space between the incisor and molar teeth (Figure 13.1) and over onto the top of her tongue.
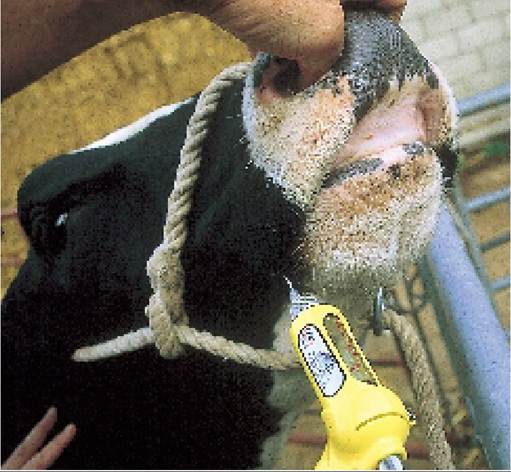
Plate 14.12. Drenches should be deposited on the back of the tongue so that they cannot be spat out.
Disbudding Calves
A cow’s horn consists of two parts, the outer casing of hoof-like material and a bone in the centre. In the calf the skin around the base of the horn becomes impregnated with an extremely hard material called keratin and this grows up over the horn to form the outer casing. An extension of the skull bone then occupies the space in the centre, as shown in Plate 9.5. The object of dehorning is to destroy the area of horn-forming skin. Unless chemical cauterisation is applied during the first week of life - and I would not recommend that method - the UK Protection of Animals Act 1911 states that calves must be given an anaesthetic before being dehorned or disbudded. The procedure is best carried out at around three to six weeks old, at an age when the horn bud can be clearly felt but before it gets so large that it cannot easily fit into the end of the disbudding iron.
The nerve to the horn runs out from behind the eye and underneath a small overhanging ledge of bone which is part of the skull. This is best seen in Figure 13.1. Using a short needle (25 mm or less), inject 3 ml of anaesthetic under this ridge on each side (Plate 14.13). You may find that blood flows from the injection site after you have withdrawn the needle. This is no cause for alarm. A vein and an artery run along beside the nerve and these can easily be punctured. It is sometimes recommended that you should slightly withdraw the plunger of the syringe before injecting the anaesthetic. If blood then appears in the syringe, you know you are in a blood vessel, and the position of the needle needs altering slightly, because intravenous injection of local anaesthetic can cause collapse.
Leave the calf for at least five to six minutes while the anaesthetic takes effect. Its action is almost immediate if you happen to have deposited it directly onto the nerve; however if you havejust missed, some time must elapse before the drug can diffuse to its target. The speed of onset of anaesthesia also varies with the anaesthetic being used.
Clip the hair around the area; then, with the calf’s head held firmly, place the hot iron over the horn so that the bud fits into the depression at the tip of the iron (Plate 14.14). Apply moderate pressure while you hold the iron in this position, count to ten and then angle the iron to scoop out the horn bud (Plate 14.15). Provided that the skin around the outside of the horn has been destroyed, it is not strictly necessary to remove the bud itself.
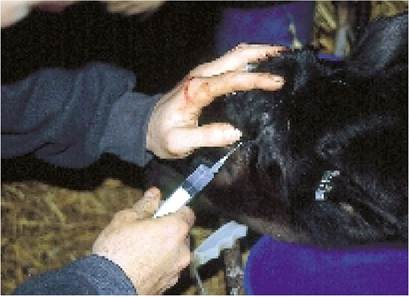
Plate 14.13. Dehorning. The correct anaesthetic site is under the ledge of bone halfway between the eye and the horn.
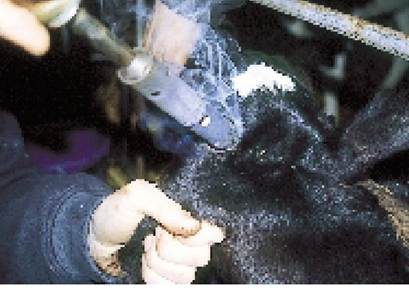
Plate 14.14. Dehorning. Make sure that the area of skin around the outside of the horn bud has been destroyed.
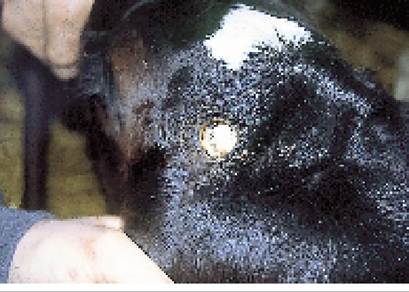
Plate 14.15. Dehorning. The horn bud has been enucleated.
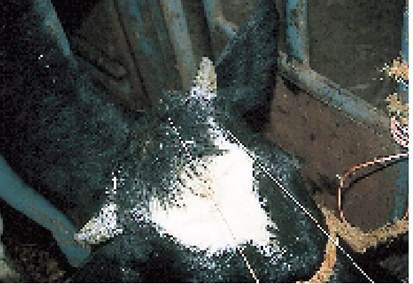
Plate 14.16. Dehorning larger cattle, using a cutting wire: make sure that the cut is deep enough.
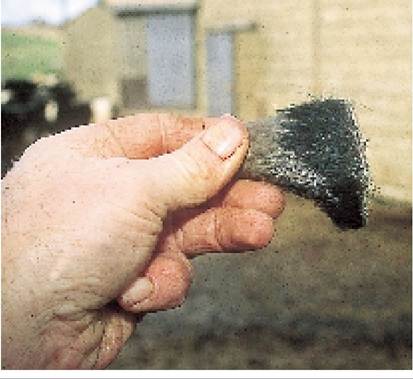
Plate 14.17. Removing the horn with a ring of hair around its base prevents regrowth.
If the bud is too large to fit into the iron, first cut it off with scissors or even hoof clippers, and then proceed as before. When using hoof clippers or if removing larger horns, for example with a cutting wire (Plate 14.16), make sure the cut is deep enough to remove the horn with a small ring of hair around its base (Plate 14.17). This is the horn-forming tissue and there is then no risk of regrowth. Finally apply an antibiotic aerosol to dry the wound and promote healing.
Removing Supernumerary Teats
As part of routine stockmanship you should always check for extra teats when disbudding calves which are to be retained for breeding. If left, spare teats may develop mastitis, or, even worse, when they are too close to a true teat they interfere with milking. By law in the UK you must use an anaesthetic in calves
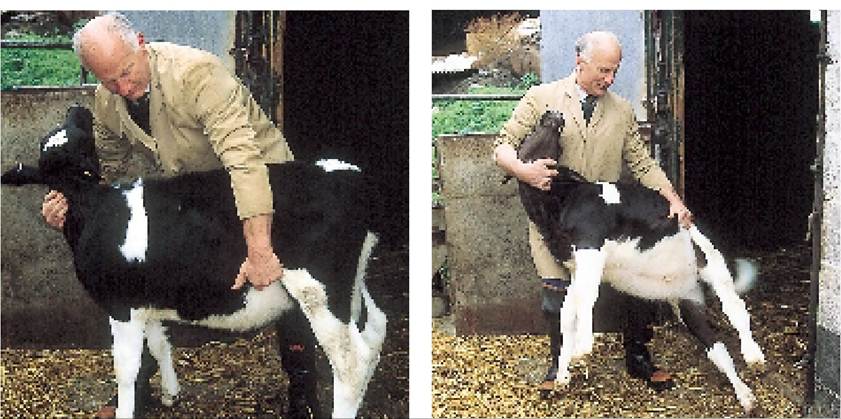
Plate 14.18. Turning a calf. Hold the calf by the flank and under the neck, lift and roll it across your knee (14.19), then use your legs to support it in a sitting position (14.20 [see facing page]).
over two months old, and if the calf is over three months old the operation may only be performed by a veterinary surgeon.
For calves between two and three months old, simply inject 2 ml of local anaesthetic into the base of the teat and disperse it by rubbing between your fingers.
In small calves it is best to hold the calf in a sitting position. To achieve this, put one arm around its neck, hold the base of its flank with your other hand (Plate 14.18) and put your knee into its opposite flank. Lift the calf slightly into the air, using a two hand hold, and roll it across your knee, with the knee as a pivot (Plate 14.19). With the calf sitting on its tail you can now hold it in position between your knees, leaving both hands free to examine the teats (Plate 14.20). There is also little risk of getting kicked in this position.
If an extra teat is found, put your finger underneath the skin to push the teat into a firm and accessible position (Plate 14.21); then amputate it flush with the skin using a pair of sharp curved scissors. The curved blades allow you to get closer and make a much neater finish. Finally, apply a topical antibiotic spray.
Castration
There are three methods of castrating calves, namely rubber rings, the Burdizzo bloodless castrator and surgical removal of the testicles. Surgical removal is by far the most certain method, and provided that an anaesthetic is used, calves may be left entire until they are four to six months old or more to obtain improved growth rates and better conformation of the final carcase.
Since 1983 it has been a legal requirement in the UK that calves over two months old may only be castrated by a veterinary surgeon. I would suggest that stockmen never attempt surgical castration therefore, because at less than two months old the testicles are so small that the technique is quite difficult.
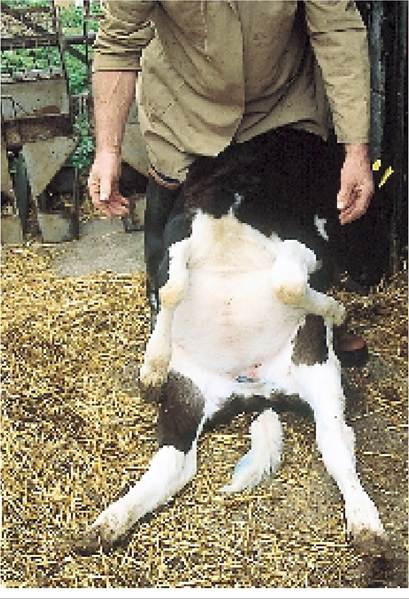
Plate 14.20. Examining the teats of a young calf.
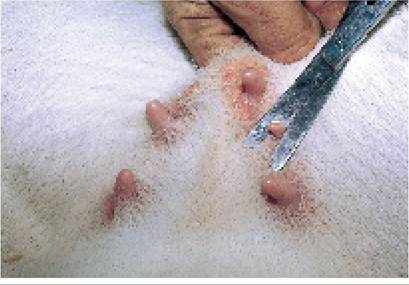
Plate 14.21. Supernumerary teats are best
amputated at disbudding, when the calf is only a Use of rubber rings few weeks old.
These are only permitted in calves less than one
week old. Hold the calf in a sitting position, make sure that both testicles are in the scrotum, then apply the ring to the base of the scrotum, as shown in Plate 14.22. Remove the applicator and check for a second time that both testicles are still in the scrotum.
Every year we are asked to examine groups of yearling heifers for pregnancy, because they have been running with a male which someone castrated without checking that both testicles were below the ring. If, at the time of castration, you still cannot find the second testicle, my advice would be to mark the calf
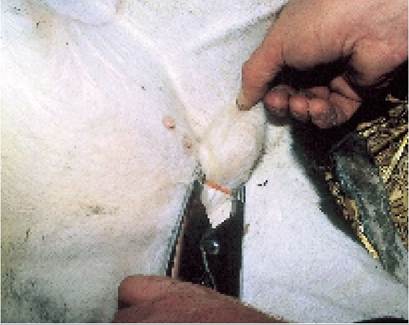
Plate 14.22. When applying an elastrator ring, make sure both testicles are in the scrotum.
and get your vet to examine it at three to four months old or more. Do not apply a ring; otherwise you will overlook the possibility of a second testicle descending at a later date - possibly to the detriment of next year’s heifers!
Bloodless castration
Burdizzo castration is based on the principle that crushing destroys the spermatic cord (which carries blood to the testicles) but that the skin of the scrotum remains intact. Approach the standing calf from behind and push one of the cords to the outside of the scrotum. Next apply the jaws of the Burdizzo, checking that the cord is held in one place by the cord-stops (Figure 14.4, position 1), and firmly close the handles. Count to five seconds. The procedure is best repeated just below the first crush (position 2) and then twice on the other cord (positions 3 and 4). You must make sure that the crush marks on each side do not join up to form a continuous line across the scrotum; otherwise there is a risk of the scrotum itself being destroyed. The second crush on each side should always be beneath the first, as shown in Figure 14.4.
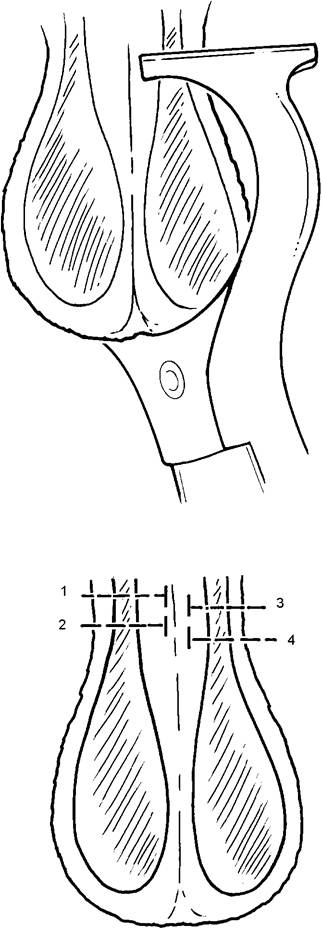
Figure 14.4. The sequence of Burdizzo castration crushing positions. Note that the first crush is always above the second, and that the crushes on each side must not be immediately opposite each other. The dotted line shows how the cord stop on the edge of one of the jaws makes sure that the cord cannot slip away.
Taking a Temperature
A thermometer is a surprisingly difficult instrument to read and you ought to first practise holding it between your finger and thumb (Figure 14.5) and gently rolling it until you are quite sure that you can see the thick line of mercury. Before inserting the thermometer, hold it at the end away from the mercury bulb and give it a few firm shakes. Now check that the mercury has returned towards the reservoir and that the thermometer registers 37°C or less. Apply some lubricant to the thermometer - I find saliva very effective and readily available! - hold the cow’s tail up with one hand and insert the thermometer into its rectum with the other. You may find that the thermometer needs to be rolled to get it to pass through the anal sphincter. At least two-thirds of its total length should be inserted. Once it is in position, deflect the thermometer to one side (Figure 14.6) so that the mercury bulb is as close to the wall of the rectum as possible. If the thermometer is left in the centre of a lump of faeces, the temperature registered may be considerably lower than the cow’s actual body temperature. This is particularly important when the cow is constipated, for example with milk fever.
Withdraw the thermometer after 30 seconds, gently wipe it clean, then take the reading by slowly rolling it between your finger and thumb until the thick line of mercury comes into view. If you are in any doubt, shake it back down and repeat the procedure.
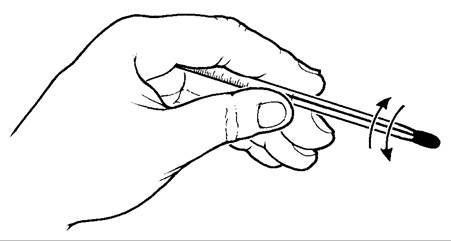
Figure 14.5. Roll the thermometer between finger and thumb until the thick line of mercury can be recognised.
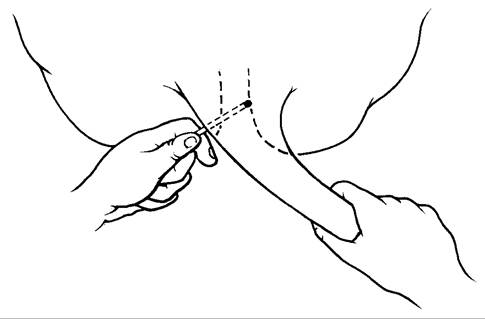
Figure 14.6. Taking a temperature: deflect the thermometer to one side so that the bulb is as close to the wall of the rectum as possible.
A cow with a high temperature most probably has an infection, but this could be a viral, protozoal or bacterial infection and only the bacteria would respond to antibiotics. Temperature may also rise with excitement, for example in a cow which has been in convulsions due to hypomagnesaemia. Unfortunately the reverse is not true, that is we cannot say that a cow with an infection will always have a raised temperature, or that a cow without a temperature definitely does not have an infection. The infection may be localised, for example an abscess or a mild mastitis, and although the infected area may feel hot to the touch, there may be no general rise in the whole body temperature. Another possibility is that the cow may initially have had a high temperature (for example in the early stages of E. coli mastitis) but as the condition progressed, toxaemia and shock set in and body temperature fell, often to below normal. A temperature below normal (that is less than 38.6°C) could be a bad sign - although it may simply mean that you did not have the thermometer positioned correctly in the rectum!
Normal values for temperature, pulse and respiration, and some of the factors affecting these values, are given in Appendix 1.
Dealing with Wounds
There are many different types of wounds and often they need careful treatment. If you are in any doubt you should call in your vet. He can then suture it if necessary, apply the first dressing and leave you instructions for aftercare. The following gives a broad outline on the approach to wounds in general.
Is it bleeding badly? A steady drip, drip of blood generally does no harm and usually will stop on its own. If you can see a continual pulsating squirt of blood, however, this indicates that an artery has been severed and you must take action. If the legs or tail are involved it is quite easy to apply a tourniquet by using a loop of rope and twisting it tight with a stick. If there is bleeding following surgical castration, a tourniquet applied tightly to the top of the scrotum is very effective. In other areas often all you can do is to push a wad of cotton wool or a tea-towel hard against the wound until your vet arrives. Sometimes applying pressure for four to five minutes is in itself enough to stop the bleeding. A tourniquet should be applied just tight enough to arrest the bleeding and only for an hour or two. If too tight or if left on too long, it can lead to gangrene of the whole area. Dealing with post calving vaginal haemorrhage is discussed in Chapter 5.
Does it need stitching? Large skin wounds and cuts on teats are best sutured, provided that there is sufficient loose skin available and that the wound is fairly fresh. However, suturing a cut over the knee, for example, is not worth while because any sutures are likely to pull out as soon as the animal starts walking. If the edges of the wounds are dry and healing has already started, suturing may not be successful. Also if the skin flap is very thin, feels lifeless and is ‘devitalised’, that is it has no feeling, suturing is probably not worth while, and on teats it is best to simply amputate the flap with scissors to prevent further skin tearing during milking (see Plate 7.37).

Plate 14.23. Abscesses can be thoroughly flushed using a hosepipe.
Cleaning the wound Infection, dirt and dead tissue seriously retard healing, so you must wash the area very carefully. If there is a skin flap, or if you are dealing with an abscess, do not be afraid to take a piece of cotton wool soaked in diluted disinfectant and wipe it deep under the skin. Repeat this with fresh swabs until they come out quite clean. Any dead tissue will have a creamy, pus-like appearance and this should also be rubbed away with your cotton wool. If the wound is an ulcer or some other lesion in the foot, then it can only be drained and cleaned by removing all the horn overlying the infected area. Abscesses may need to be lanced to allow the pus to drain, but first clean the skin, insert a needle and withdraw some of the contents of the swelling to make sure you obtain the characteristic off-white, thick, foul-smelling pus indicating that you are dealing with an abscess. If this is not found, leave the swelling alone and ask your vet to look when he next comes. Abscesses should be lanced at their lowest point, as this facilitates drainage. If possible, choose a place where the skin is softening and make a deep bold cut with a scalpel blade. Squeeze out all the pus, and then flush the abscess cavity with antiseptic solution.
This flushing process needs repeating every two to three days. It is most important that the initial cut does not heal over for at least a week; otherwise drainage will be inhibited and the abscess may re-form. One easy but very effective way of flushing out an abscess is simply to put a cold-water hosepipe into the cavity and then turn on the tap (Plate 14.23). The water pressure will help to remove all the pus and dead tissue present.
Does it need a dressing? Very large raw areas may be best covered but dressings must be regularly changed. Apply an antiseptic ointment, then a lint dressing, and cover this with cotton wool held in position with elastoplast. Abscesses are best left open for the pus to drain. Foot dressings, discussed in Chapter 9, are now rarely used. Burns are discussed in Chapter 10.
Ointment or spray? For many wounds, especially those on teats or other areas where the skin can crack, I prefer to use an emollient ointment, preferably one with antiseptic properties. This is especially important for severe teat chapping since teat skin lacks the sebaceous glands found on skin elsewhere in the body. Glycerine is an excellent treatment for chapped teats and for sores between the udder and thighs of freshly calved cows, as for example in Plate 7.41. Antibiotic aerosols containing coloured dyes tend to dry
out wounds. They are therefore very good for superficial skin cuts and following dehorning, but if applied to teat skin they may lead to excessive cracking which would retard healing.
Putting on a Halter
Perhaps this is hardly a veterinary task, but it surprises me how many people cannot apply a halter correctly. Lassoing a cow leads to unnecessary stress and does not restrain it particularly well because it can still move its head from side to side. The correct procedure is shown in Plate 14.24. There are essentially three pieces of the halter:
• the fixed length segment which fits over the animal’s nose
• the lead rope which should come out from underneath the animal’s chin
• an adjustable loop which fits behind the animal’s ears
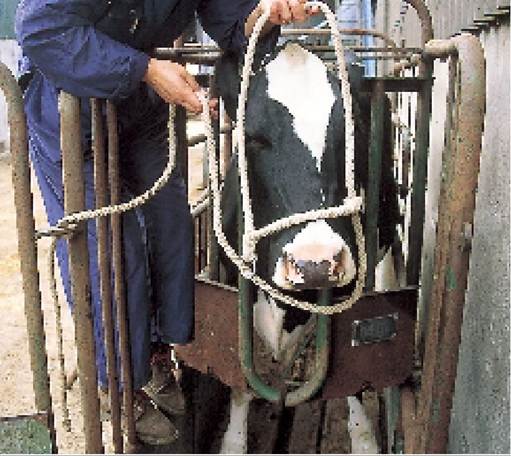
Plate 14.24. Applying a halter: the fixed length goes over the nose and the lead rope exits from under the chin.
If possible, apply the halter in one movement, by lifting the lower loop over the animal’s nose and continuing to fit the upper loop behind its ears. Finally adjust the lead rope so that it is tight under its chin and check that the side pieces are not rubbing its eyes.
Applying Nosegrips (Bulldogs)
Another method of restraint, which holds the animal even more securely for difficult procedures, is to apply nosegrips. These should be inserted behind the thick tissue of the nose and muzzle. Slide the metal clamps on the handle towards the nose, so that they cannot be pulled out (Plate 14.25). Within reason, the tighter they are, the less painful they are for the cow, because they are more firmly placed and less likely to pull out. In horses, pressure applied to the nose (for example by a twitch) leads to the release of endorphins, chemicals which specifically dull pain sensations throughout the body. The same probably applies to cattle.
Casting a Cow - Reuff’s Method
Although cattle are most commonly restrained in a crush, it is sometimes useful to be able to cast them. With the help of sedation, I use the Reuff’s method of casting for rolling cows to correct a displaced abomasum and also for casting bulls for foot trimming when they are too large to go into a crush. Steady the cow with a halter, then tie a second rope around her neck, looping it behind her fore legs, and then in front of her udder, hind legs and pin bones, as shown in Plate 14.26. Tighten the chest loop, and then pull hard on the free end to tighten the abdominal loop. Provided sufficient tension can be applied, the animal will sink to the ground (Plate 14.27), and it will stay there while the rope remains tight. Although this
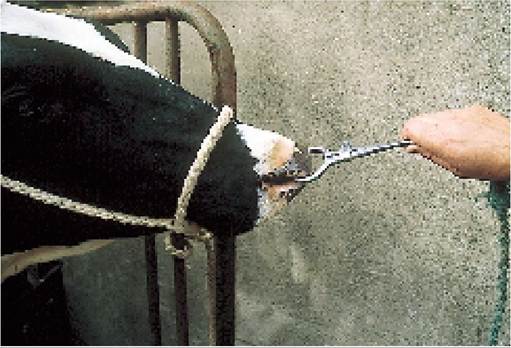
Plate 14.25. Nosegrips (bulldogs) permit additional restraint of the head.

Plate 14.26. Casting a cow: a single length of rope is looped three times around the body.
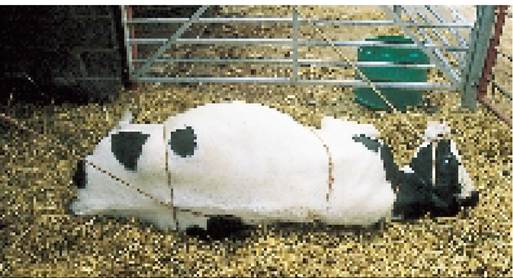
Plate 14.27. Casting a cow: by tightening all three loops, the heifer falls to the ground.
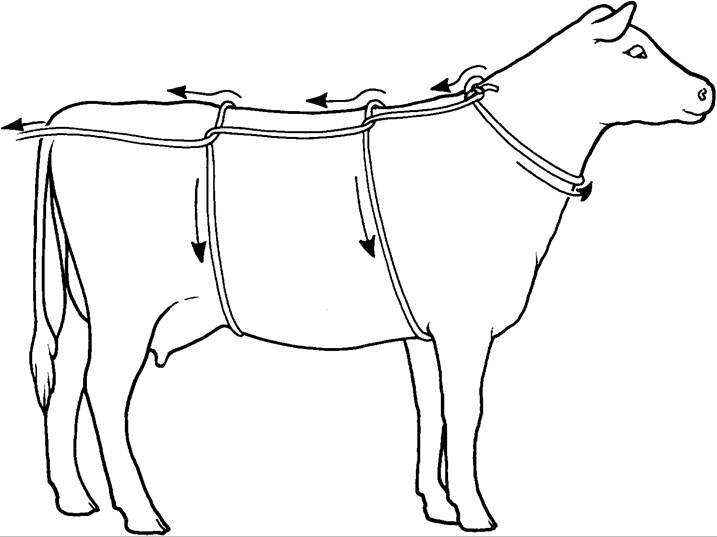
Figure 14.7. Position of rope to cast a cow by Reuff's method.
procedure will work with any cow, it is much easier if the cow has been sedated first. Take care that the rear loop of rope is not catching on the udder.
Ringing a Bull
For ease of handling and for safety, I think it is best to ring a bull soon after he is six months old, and then make sure that he gets used to being led. Holding the bull’s head very firmly, inject a small volume (1-2 ml) of anaesthetic into the soft tissue dividing the nostrils before applying the nose punch (Plate 14.28). The hole should be made as far back from the nostrils as possible for added strength, but it should not go through the harder tissue of the cartilage of the nostrils. You can easily feel this with your fingers. Having firmly closed the punch, move it up and down a few times to cut the hole through completely, and then insert
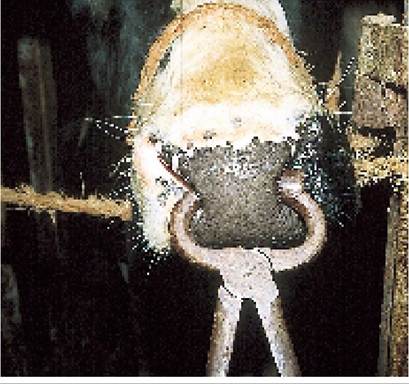
Plate 14.28. Bull ring nose punch: insert the ring well back, but do not puncture the nasal cartilage.
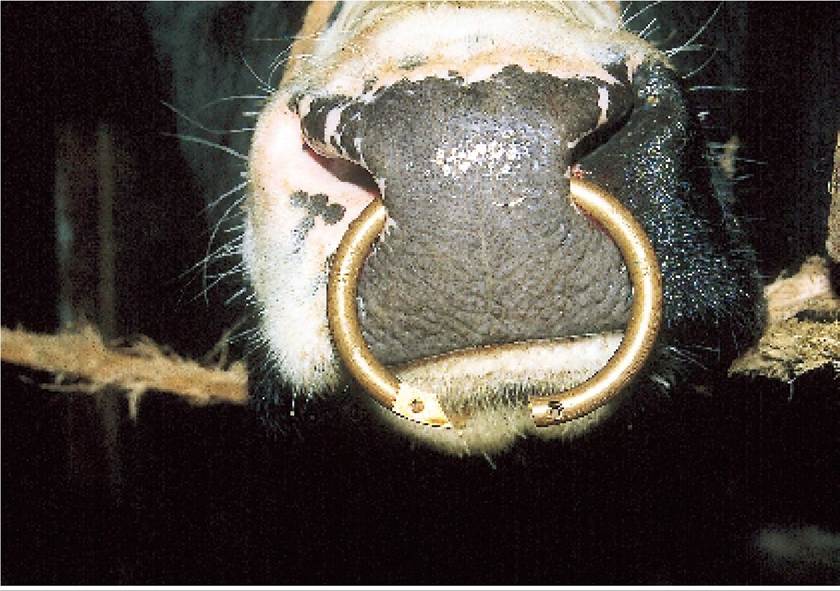
Plate 14.29. Ringing a bull: after being closed, the two ends of the ring are held together with a locking screw.
the ring (Plate 14.29). Carefully position the locking screw in the thread, screw it up as tight as possible, then break off the protruding segment. File away any rough edges. It is best to allow two to three weeks for the hole to heal before training the bull to lead.
Hormone Implants and Growth Promoters
Hormone implants
During the early 1980s there was a marked increase in the number of hormone implants used for fattening cattle, and by 1986 well over 50% of all cattle slaughtered in the UK had been treated at some stage of their lives. However, following consumer pressure in 1988 the EU imposed a ban on all hormone implants even though the scientific committee which they had set up to investigate their safety had not at that time reported. A ban was also proposed for all other hormones used for non-therapeutic purposes in meat-producing animals.
At the time of writing, the hormone implant ban continues in the EU and, although zeranol has been cleared as ‘safe’ in North America, the EU prohibits the import of North American beef.
The rationale of hormone use was as follows:
• heifers and cows have ample female hormone so they can be implanted with male hormones
• steers have no hormones and can be implanted with male and female products
• bulls have ample male hormone and some female, and are given additional female hormones
The response to implantation is therefore greatest in steers, where a 30% increase in growth rate can be anticipated, with additional improvements in carcase quality and in feed conversion efficiency. Implanted heifers and cull cows become much more muscular and some may even develop a few male characteristics. As hormone implants affect growth rate it is clearly most advantageous to use them when the animal’s natural rate of growth is already at a high level. For example, a 30% improvement in the growth rate of an animal growing at 0.3 kg per day is only 0.1 kg, whereas if the natural growth is already 1.5 kg per day, a 30% improvement would give 0.5 kg per day. The relationship is by no means as simple as this, but the example serves to illustrate the point very well.
The effects in entire bulls are much less dramatic, partly because of their natural rapid growth and good carcase conformation. Implants of female hormone should still give them a 5-10% increase in growth rate, however, and there may be additional benefits from reduced mounting behaviour and aggressiveness.
Implants were given under the skin of the ear, because this is the part of the carcase which is discarded and there is then no risk of large residual doses being eaten. The implanting technique is very similar to that for progesterone implants (Plate 8.5). The products used were either synthetic compounds (e.g. zera- nol and trenbolone) or natural hormones (e.g. oestradiol, testosterone and progesterone). The natural hormones were equally as effective as the synthetic compounds, they had the advantage that no withdrawal period was necessary (that is, cattle could be slaughtered at any time after the hormone had been implanted), and it was hoped that they would be more acceptable to the consumer lobby.
BST, a hormone which increases milk production, may also become available as an implant. It is however not licensed for use in the EU. A full description of its function is given in Chapter 7.
Growth promoters
The growth promoters in use are primarily substances which influence the growth of micro-organisms. Both avoparcin and zinc bacitracin were once widely used, but in 1997 avoparcin was banned in the EU due to concerns over possible carcinogenic activity and zinc bacitracin was banned in 1999. Growth promoters are totally non-absorbed from the gut and there is therefore no problem with meat and milk residues. They act by destroying certain gut micro-organisms and thus promoting a more efficient use of food.
The growth promoter monensin has a wide variety of uses. It is effective against coccidiosis in chickens and calves, it helps to prevent fog fever in cattle and it reduces the incidence of toxoplasma abortion in sheep. As a growth promoter, it acts in the rumen, altering the fermentation pattern to produce a higher proportion of propionic acid and hence to promote more efficient food utilisation and faster growth. Like bacitracin, it can be included in the concentrate portion of the ration. Animals over 160 kg bodyweight can be dosed at the start of the grazing period to provide a continual low dose of monensin for five months. Gains of around 15-20 kg would be expected, although there would not be the improvement in carcase conformation which is seen with hormone implants.
Applying Eye Ointment
See Chapter 4.
Using a Mastitis or Dry-Cow Intramammary Tube
See Chapter 7.
Taking a Milk Sample
See Chapter 7.
Foot Trimming
See Chapter 9.
Handling a ‘Downer’ Cow
See Chapter 5.