General Principles of Histology
OBJECTIVES
• define and understand the principles of histology
• understand the methodology of preparing a histological section
• know how a histological section relates to the gross structure of an organ
• identify common artifacts occurring in histological sections
• understand how to section and prepare a piece of tissue for fixation so it can be sent to a laboratory for histopathological examination
MATERIALS
• a three-dimensional model of a glomerulus and Bowman’s capsule
• one apple and one lemon
Introduction
Histology is the study of tissues; more specifically, it is the study of the microscopic anatomy of tissues.
Thus, it complements the study of gross anatomy and provides the structural basis for the study of organ physiology. A tissue is a group of cells that are of similar structure and are united in the performance of a particular function. Tissues are organized into organs, such as the intestines, heart, lungs, and kidneys. Most organs contain numerous types of tissues, and the arrangement of the tissues determines the organ's structure and function.31
Copyright 2010 Cengage Learning. All Rights Reserved. May not be copied, scanned, or duplicated, in whole or in part. Due to electronic rights, some third party content may be suppressed from the eBook and/or eChapter(s).
Editorial review has deemed that any suppressed content does not materially affect the overall learning experience. Cengage Learning reserves the right to remove additional content at any time if subsequent rights restrictions require it.
Preparation of Histological Sections
Histological sections are very thin, usually from 0.5 to 10 micrometers (μm), or microns, thick. The tissue must be preserved to prevent autolysis. This can be done by fixing the tissue in a preservative or by freezing it. Frozen tissues can be cut and observed immediately, but for a more permanent preparation, the tissue must be infiltrated with a supporting medium, cut into sections, and then mounted on a slide.
Tissues infiltrated with plastic can be as thin as 0.5 μm and show superior detail. Paraffin also can be used as the supporting medium and produces excellent preparations sectioned as thin as 2 or 3 μm. Slides are stained after mounting to increase visibility and to differentiate between the various cellular and intracellular components.Figure 4.1 outlines the steps involved in producing a stained histological slide via the paraffin procedure. This same process may be used to produce a histological section of normal tissue for study or a histopathological section of diseased tissue for analysis and diagnosis. The study of the pathology of tissues at the microscopic level is called histopathology. Tissue sections are obtained from animals, usually during a surgical procedure or during a post-mortem examination or necropsy procedure. The pieces of tissue are placed into a fixative, such as buffered formalin or Bouin’s fixative. These solutions preserve the normal morphology and facilitate further processing. To remove the water from the cells, after fixation the specimen is transferred through a series of alcohols with successive increases in concentration up to 100%. Then, the alcohol is removed by placing the specimen in xylene or a xylene substitute; this process is called clearing. It is necessary because paraffin and alcohol do not mix. After clearing, the specimen is placed in a paraffin bath heated tojust above the melting point of the paraffin. Through this process of infiltration, the paraffin completely replaces the xylene. The sample is then transferred to an embedded mold of fresh paraffin, which is allowed to harden. The mold is removed and the excess paraffin is cut away.
A special instrument called a microtome is used to make thin slices of tissue. The paraffin is attached to the microtome adjacent to the microtome knife blade, and with each revolution of the instrument’s handle, a slice of tissue of a desired thickness is made. Because the paraffin tends to stick to itself, a ribbon of tissue sections is produced.
The sections are floated in a warm water bath, which softens the paraffin and flattens the section, eliminating wrinkles. Once flattened, the desired section is placed on a slide and allowed to dry. Next, the paraffin is removed with xylene or another solvent, and the specimen is rehydrated. It is then stained, dehydrated, cleared (made transparent) with xylene, and covered with a resinous mounting medium. Finally, a cover slip is placed on top.Hematoxylin and eosin (H&E) stains were mentioned in the previous chapter. The hematoxylin portion is the basic part of the stain; it stains basophilic (base-liking) areas of a tissue sample blue or purple. Also mentioned in Chapter 3 was that acid and base chemicals bond together. Thus acid molecules, like RNA and DNA, are basophilic, bind with hematoxylin and stain blue or purple. The eosin portion is the acidic part of the stain; it stains acidophilic (acidliking) areas red. Cytoplasm contains a number of basic molecules and is thus acidophilic binding with the eosin and stains this area of the cell reddish in color. Other stain that are basic stains and act similarly to hematoxylin are methylene blue, toluidine blue, and basic fuchsin. Other acid stains similar to the eosin stain are orange G, phloxine, and aniline blue. Other widely used stain combinations are useful for identifying certain elements of tissues. Trichrome procedures, such as Mallory trichrome stain, specifically stain the collagen fibers of connective tissue. Orcein and Weigert’s resorcin fuchsin are stains that color elastic fibers. Some silver stains enable viewing of reticular fibers and nervous tissue components, such as neurons, myelin, and cells of the neuroglia. Finally, stains such as Wright’s and Giemsa’s (Romanovsky stains) are used for differentiating the various cells found in blood and bone marrow.
Interpretation of Histological Sections
It is necessary to have an idea of the structure of the organ sectioned to comprehend the microscopic anatomy of the specimen under the microscope.
First, you need to know or learn what type of organ it is, its shape, whether it is solid or has a hollow interior, and how the cut was made through the organ to produce the sample. It is helpful to know whether it was a cross section (x.s.), a longitudinal section (l.s.), or an oblique slice through the organ. Also, knowing if the section shows the entire organ or just a piece of it is beneficial.Most prepared slides are labeled to indicate the particular orientation of the section. This is very important when considering symmetrical organs or those with a hollow core, such as the urinary bladder or a section of small intestine. These organs have radial symmetry and their appearance is affected by the direction of the cut. On the other hand, the appearance of an asymmetrical organ, such as the liver or spleen, is unaffected by the direction of the cut.
It is also important to know where the section of tissue was taken in organs that have dramatically different areas of tissue. The kidney’s cortex, for example, is the area where the glomeruli, Bowman’s capsule, and the convoluted tubules of the nephron are located; a sample section from the outer part
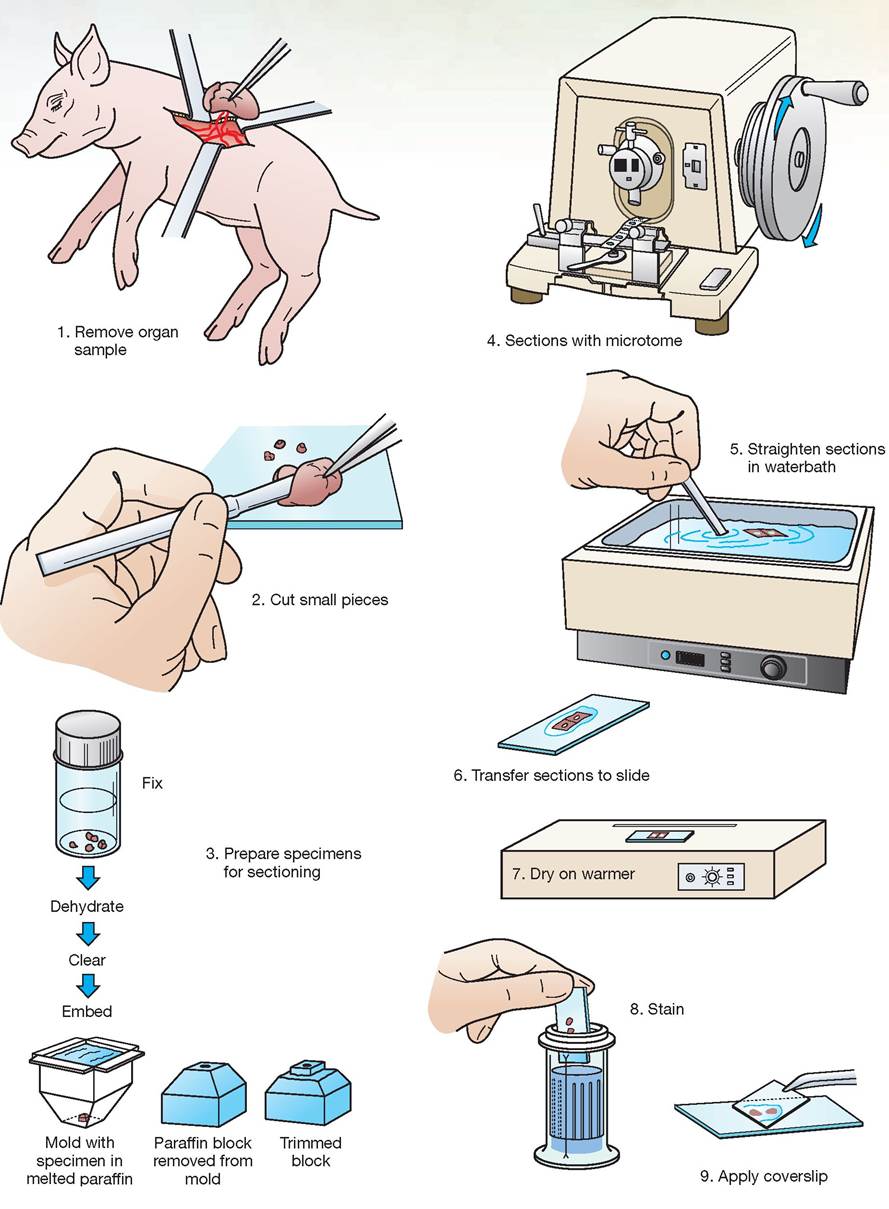
FIGURE 4.1: Steps in producing a histology slide.
of the kidney would include the cortex but not the medulla.
Therefore, it is necessary to consider the three-dimensional structure of organs and their components when examining histological preparations. This enables viewers to understand the appearance of the cells in terms of their size, shape, and arrangement. Because cells themselves are three-dimensional and vary in size and shape, the way they appear on a slide is dependent on their shape as well as how they were cut. Figures 4.2 and 4.3 show a variety of organs, the ways they might be sectioned, and the ways the cells and tissues taken from them might appear.
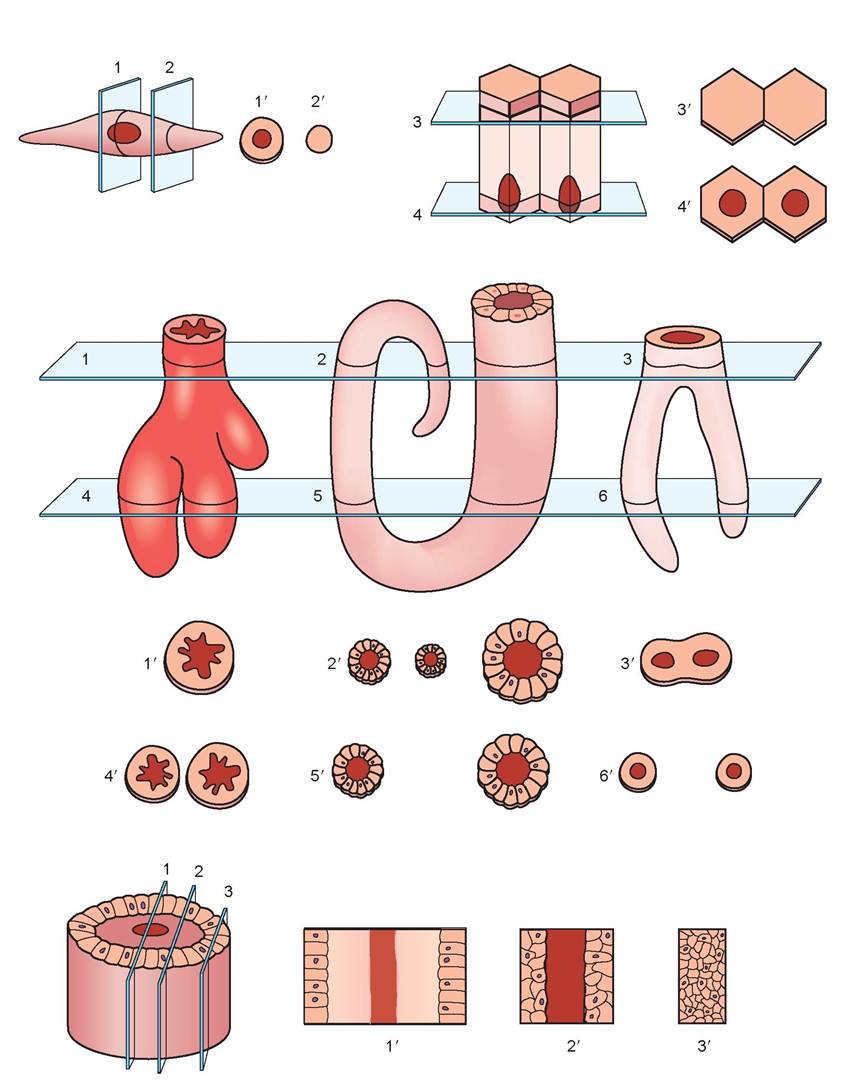
FIGURE 4.2: Appearance of cells and tissue when sliced.
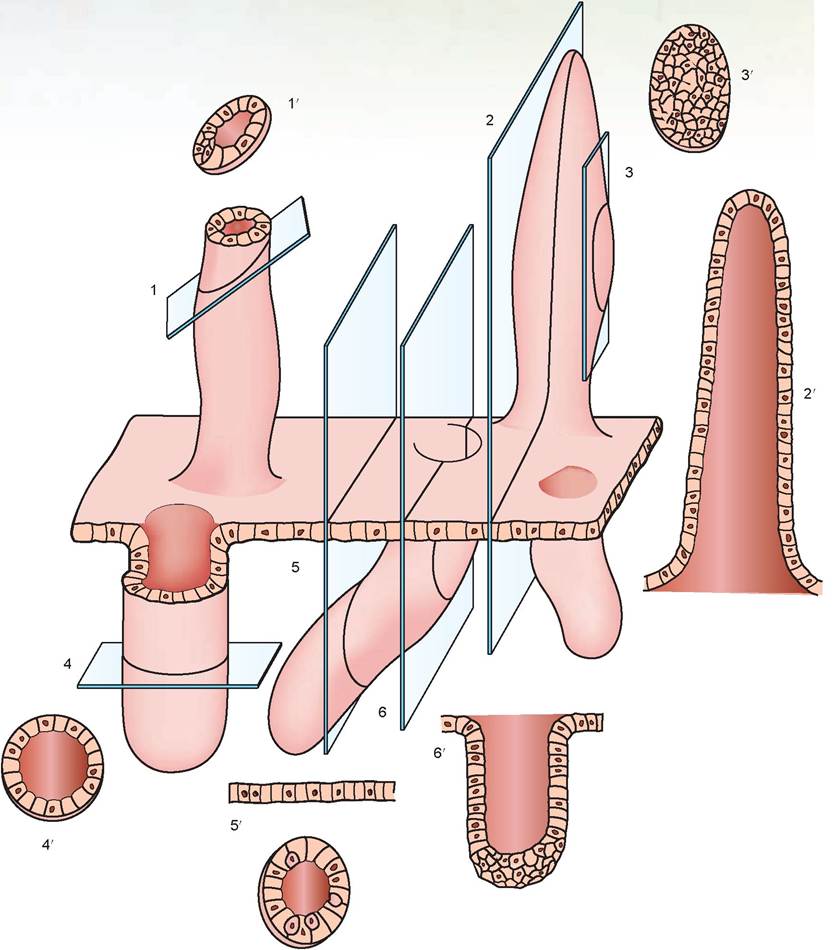
FIGURE 4.3: Appearances of cells and tissue when cut at various angles.
EXERCISE 4.1 DEMONSTRATION OF SECTIONING METHODS
Using an apple or lemon can help you visualize cuts made through tissues and organs. An apple is good as a model of a solid organ, whereas a lemon is good as a model of a hollow organ.
In steps 1-4, an apple is cut in such a way as to demonstrate both the frontal and transverse sections of an organ. In steps 5 and 6, a lemon is used to illustrate a longitudinal cut.
Imagine the flesh of the apple as the exterior portion of an organ (the cortex), and the apple’s core (the medulla) as the vascular center of the organ. Use the top of the apple, where the stem is located, as the front surface of the organ, and the bottom of the apple as the rear surface. We will consider the front-to-rear dimension of the apple to be the longitudinal axis of the organ. Mark the top, or superior, surface of the apple with a permanent marker or felt-tipped pen, and do the same to indicate the inferior surface of the organ. As you perform the following cuts, notice how different slices through the apple look when the cut surface is viewed.
1. Mid-frontal cross section: Cut the apple in the middle, midway between the stem end and the bottom end, dividing it equally, front and back. Both the cortex (outer pulp) and the medulla (core) are visible in our simulated organ (Figure 4.4).
2. Para-frontal cross section: Make a second slice in the rear half of the apple approximately 1 cm from the first cut and parallel to it. This section shows mostly cortex; only part of the medulla is visible when viewing the cut surfaces of the two pieces (see Figure 4.4).
3. Mid-transverse cross section: A transverse plane divides an organ into superior and inferior parts. Using the front half of the apple, make a cut halfway between the top and bottom, dividing the apple equally. This cut should go through the stem of the apple.
Both the cortex and medulla of our organ can be seen in this section.4. Para-transverse cross section: Make another cut parallel to the previous cut, halfway toward the bottom of the apple. This section only engages the cortex.
5. Mid-sagittal longitudinal section: Take the lemon and cut it lengthwise, dividing it into left and right halves (starting at the stem end and cutting toward the bottom). The fruit of the lemon represents the cortex of an organ, and the white fibrous middle area the medulla. This cut is down the lemon’s longitudinal, or long, axis (Figure 4.5).
6. Para-sagittal longitudinal section: Take one half of the lemon and make a cut parallel to the first cut. This section shows mostly cortex and no medulla.
7. Take the remaining half of the lemon and remove the fruit, leaving only the skin. It now has the appearance of a hollow organ, such as the urinary bladder. You could even imagine that the pointed end of the lemon is the start of the urethra, and that the skin of the lemon represents the layers of cells lining the bladder’s cavity. The yellow exterior of the lemon would be the serosal surface, that is, the part of the visceral peritoneum that gives the bladder surface its moist, shiny appearance inside the abdominal cavity of an animal (see Figure 4.5).
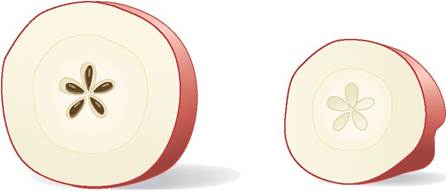
FIGURE 4.4: Cross-sectioning using an apple.
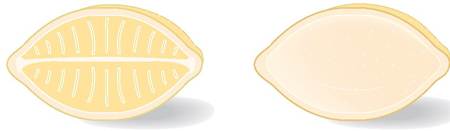
FIGURE 4.5: Longitudinal or sagittal sectioning using a lemon.
EXERCISE 4.2 LONGITUDINAL SECTION OF BOWMAN'S
CAPSULE USING A PLASTIC MODEL
1. Examine the plastic model of Bowman’s capsule surrounding the glomerulus of the nephron of the kidney. The simulated cut is a longitudinal section. Note that you are able to see the shape and relative sizes of the bisected cells that form this capsule when the model is viewed sagittally (Figure 4.6). These cells are called simple squamous epithelial cells. Note that they are only a single layer thick.

FIGURE 4.6: The internal appearance of the renal corpuscle viewed through a microscope.
2. If you were to look at Bowman’s capsule from the exterior surface rather than from the cut surface (Figure 4.7), it would appear as a mosaic of cells in the shape of a ball, similar to a soccer ball. From the exterior, we could not tell whether Bowman’s capsule was hollow or how many layers of cells were present unless it were transparent.
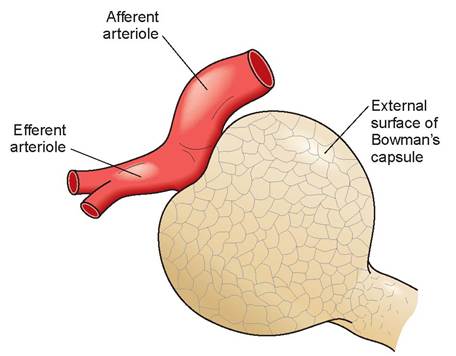
FIGURE 4.7: External view of the renal corpuscle.
Cross-Sectional Appearance of a Sheet of Cells
Sometimes cells are arranged in sheets (epithelial cells are the best example of this) and appear as flat cells, as seen in Figure 4.8. As with the exterior of
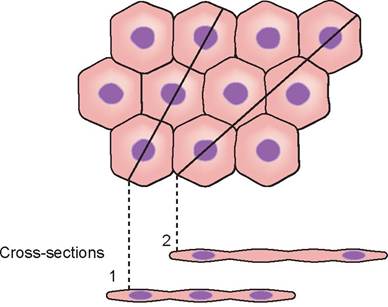
FIGURE 4.8: Flat surface of squamous cells and their cross-sectional appearance.
Bowman’s capsule, you do not know how many layers are present based on this superficial view. Think of standing on a tile floor in a room. Looking at the tile, you cannot tell whether there is only one layer present or if the builders layered the tile on top of a previous floor. To determine whether you are observing one or many layers, a cross-section or longitudinal section is necessary. In Figure 4.8, the dark dots are the nuclei of the cells, the light purple areas are the cytoplasm, and the borders are the cell membranes. Note that each cell is equal in size.
Cross-section #1: This cross-section of a sheet of cells bisects each cell and its nucleus. Each cell is of equal size and the nuclei can be observed to be centered in each cell.
Cross-section #2: This cross-section does not bisect the cells or nuclei equally; therefore, the cells no longer appear to be equal in size, and some cells do not appear to have nuclei. The situation in cross-section #1 rarely, if ever, occurs when observing sectioned tissue under the microscope. Cross-section #2 is what an observer is likely to see in real-life cellular histology.
Clinical Significance
Often, veterinarians want to look at tissues of tumors or other sites of pathology before sending the specimens to the laboratory for histopathological analysis. One method of doing this is to make an impression smear of the tissue prior to fixation. The mass is sectioned so a freshly cut surface is available. The section is then blotted dry on a clean paper towel and touched lightly several times in a row on a single glass slide. It is then ready for staining.
An alternative method is to use a scalpel blade to scrape a freshly cut surface of the extracted tissue so that an accumulation of cells collects on the blade surface. The tissue on the blade is then smeared along approximately 3/4 of the surface of a glass slide (leaving room for the slide to be labeled).
Another technique for viewing abnormal tissue of an animal’s body is a fine needle aspirate. A 25- or 22-gauge needle is introduced into the mass, and negative pressure is applied to a syringe attached to the needle. Several passes through different tangents of the mass should be conducted. Following withdrawal, the needle is removed from the syringe, and the syringe is filled with air and reattached. The cellular contents of the needle are then blown onto a clean glass slide. A squash-prep procedure is used to spread the contents on the slide. This is done by placing a second glass slide on top of the specimen on the first slide at a perpendicular angle. The slides are then drawn apart by sliding the top slide away from the bottom slide, leaving a smear of cells and tissue f iuid on both slides.
Summary
During surgery a veterinarian cannot stop to prepare a specimen for viewing or shipment, and then go back to finish the surgical procedure. This is one reason why educated veterinary technicians are so valuable in a veterinary hospital; they know how to do these procedural tasks. In this chapter you have learned what various sectioning techniques may look like when viewed with a microscope.
REVIEW QUESTIONS
1. Define histology.
2. Define histopathology.
3. What is the purpose of “fixation”?
4. What is the name of the instrument that cuts thin slices of tissue?
5. True or False: Basic stains are acidophilic, and thus are attracted to DNA and RNA.
6. In a hematoxylin and eosin stain, the eosin stains tissue what color?
7. What do x.s. and l.s. mean on a slide label?
8. Which plane divides an organ into left and right halves?
9. Which are you more likely to see on a histology slide: cells of equal size or cells that vary somewhat in size? Explain why.
10. Name three methods of making slides of tissues prior to sending the entire specimen to a lab.